EDI Processing Verification Steps [How To]
Welcome to another one of our ‘How To’ blogs on our fully integrated business management solution, erpWizard. Today’s How To is on EDI Processing under the Sales and Distribution module. Have a look!
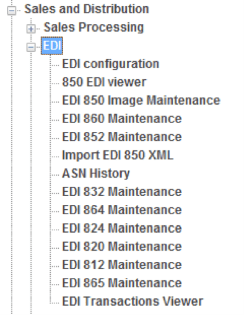
EDI Menu

1. EDI (Partner) Configuration
In order to correctly process the EDI documents, the partner must be properly configured for all incoming and outgoing documents. This includes the following:
– General Partner Information
– Stores Translation
– Payment Terms Translation
– Unit of Measure (UOM) Translation
– SKUs Translation
– Setup of each document being sent or received (e.g. 850, 856, 810, etc…)
Please see the 3-part article on setting up EDI in erpWizard entitled “Setup EDI partners in erpWizard [1 of 3]” for detailed instructions on how to configure the EDI Partners.
2. Receiving an 850
When you receive an 850 (PO) from the customer, it will be processed by iBolt and imported into UniPaas after being processed by EDI2XML and turned from EDI to XML, then generated into Sales Orders. This process can also be done manually (in case you need to re-process an 850).
To manually process an 850:
- Open the program “850 EDI Viewer” from the menu.
- Right-click to open the menu and run the program “Import EDI 850 XML”. This program can also be run straight from the main menu.
- Select the EDI 850 and right-click to open the menu. Run the “Generate 850 Image”.
- View/Modify the 850 Image from the same program however, in order to generate the orders; you will have to run the program “EDI 850 Image Maintenance”.
- From the EDI 850 Image Maintenance screen, select the new image, then right-click and select “Verify 850 Image” from the menu.
- Once verified you can right-click on the selected 850 image and run the program “Generate into Orders”.
3. Sending an 856 (ASN)
The 856 will be generated from the close shipment process and the XML file will be created in the folder specified in the parameters table.
Once the ASNs have been processed and sent (from the EDI Machine) then you will see the ASNs in the Reconciliation Viewer. You should be checking the reconciliation viewer to make sure that the ASNs were in fact sent and received by the customer.
If for any reason you need to re-send an ASN, you can do so from the “ASN History” program. Tag the ASN(s) you wish to re-send (by pressing the Enter key). Once you have tagged the ASN(s), right-click and select “Send Tagged ASNs” from the menu.
4. Sending an 810 (Invoice)
The 810 Invoice is generated through the “Invoices and Credits Printing” program found in the menu under Accounting/Accounts Receivable/Entries and Processing. The 810 XML file will be created in the folder specified in the parameters table for any invoice where the customer’s setup is EDI for the invoices.
Once the Invoices have been processed and sent (from the EDI Machine) then you will see the Invoices in the Reconciliation Viewer. You should be checking the reconciliation viewer to make sure that the Invoices were in fact sent and received by the customer.
If you need more information on the simple steps of EDI processing in erpWizard, contact our team today.


